Showing posts with label Homemade Tools. Show all posts

Friday, December 8, 2017

DIY Baby Teether

As I announced a few weeks ago, I'm currently expected our second little early learner.  I am so excited and have been busy planning all out fun activities!  Since my best friend is also expecting, we decided to have a girls night and make a baby craft.

This is what we came up with.  They're natural wood and silicone teethers.  The two round ones I plan on just giving to the baby either at home or in a stroller.  The two long ones I plan on hanging from a baby gym so the baby can practice reaching and grasping.  The black, white and red one I figured would be good to start with, for visual stimulation.


We ended up ordering quite a bit between us, but I made four things, she made five and we have lots left over to make more.  I figure, on a per item basis, it wasn't too expensive and it was a fun evening.

We got this kit, which came with a very handy little box.  It's where we stored all the extra beads and string when we were done.  We also got some hexagonal silicone beads and round silicone beads to augment the set.  I was glad we did.  Below are pictures of everything we have left after both of us finished our projects.


Stringing them was simple, although having a big needled helped tremendously.  We made sure to knot the string tightly, and secured it with some nontoxic clear nail polish.  The beads all all big enough, they shouldn't pose too much of a choking hazard, even if they were to break free.

I'd love to hear any ideas you have for DIY baby projects!  I still have 6 months to fill!

Friday, July 25, 2014

X for X-Ray


See what we did for other letters in the Alphabet in Simple Science.

X for X-Ray

Science Notebook Page (Click the picture to print).

     Background
As with all topics, we started off by talking about what X-rays are.  I actually included two different science notebook pages, depending on how complex of a definition you wanted for your little one.  I went ahead and used the more complicated one for Xander (a type of picture of the inside of something taken using electromagnetic waves).  I started off asking him how doctors look at peoples' bones when they get hurt.  We talked about how skin, muscles, and organs are in the way of seeing bones directly, so doctors use special types of pictures called X-rays.

Of course, we started off reading some books.  I picked up X-Treme X-Rays and from the library.  Both had real photos of X-rays in them.  Unfortunately, my dad took a really fall off his bike this week which resulted in an ambulance trip to the hospital.  I literally got the call while we were reading these books.  Since Xander went to the hospital with me until I could get someone to take him for the night, we got to have a conversation about CT scans and how they're another way doctors can look inside us.
 
I picked up this great Your Body puzzle when the price dropped for a little while, and the timing ended up being perfect for talking about X-rays.  Xander was able to see how there are many layers/systems of the body.  Here he is pointing to some of the bones he knows.

Light Table X-Rays
Materials:
Transparency Paper or Vellum
Laser Printer

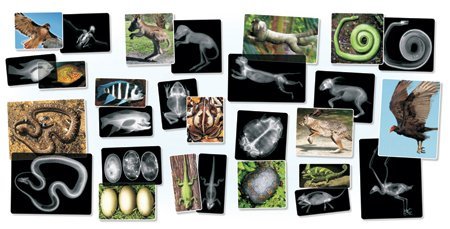
Alright, so I'll admit that this week wasn't much of an investigation, but x-rays are difficult!  What I really wanted was this animal x-rays set where Xander could match images of the outsides and insides of animals.
Sadly, it just wasn't in the budget (although we have played with them at the local children's museum).  Therefore, I decided to make my own x-ray materials for the light table.  It ended up being pretty easy.  I picked up some clear vellum from the craft store.  Then I used Google Images to find some x-ray images and printed them off (it might work with ink jet, but I didn't want to risk ruining the vellum, so I borrowed someone's laser printer).  They'd probably be even better on transparency paper, but I didn't have any.  I think they turned out pretty well, particularly given how inexpensive they were to make.

Check out my Alphabet in Simple Science Pinterest Board for more ideas!
 

Monday, June 16, 2014

Magnetic Marble Run... Almost - Taking the Small Wins

So I admit that I have a slight obsession with all things early education.  I particularly LOVE constructive, open ended toys.  They are so wonderful in that they allow children to make and test predictions immediately (can I balance this on my tower without it falling), adjust plans, and solve problems without them even realizing.  Not to mention, I kind of always wanted them as a child, but really didn't have too many because I was a girl, although that's a totally different post!  Anyway, I've always got my eye out for fun toys like that and reading the book Design Make Play, made me start thinking about how I could make some of my own at home.

One idea I came up with was a magnetic marble run.  I saved a bunch of paper towel and toilet paper tubes and when I had plenty, I attached some dot magnets and cut semicircles at some of the ends.  I had all these visions of big elaborate marble tracks crisscrossing my fridge.  I saved a yogurt container that I planned to use to "catch" the marble at the end.  Xander was super excited.

Sadly, it was not to be.  The magnets weren't strong enough and the marbles were too heavy.  When they would come to an end where we expected it to go back the other way, the marble would rotate the tube and fall to the floor.  The magnets also fell off the yogurt container.  We were both a little disappointed.  However, we kept playing with it and found that Xander liked making shorter tracks and shooting them into a plastic shoe-box that I put all the tubes in.  It seems to work fine as long as you don't try to switch back the opposite direction down the fridge.  That first day he played almost half an hour (eons in toddler time!).  He's also gotten it out since.  Oh, and used the tubes as telescopes, microphones, swords etc.
Even though it didn't quite turn out like planned, it still ended up being a fun, creative, inexpensive activity for him.  The magnetic tubes will probably stay on our toy shelves for quite a while.  

As happy as I am with this homemade version, I will admit, I purchased him some transparent marble runs from Lakeshore because they're currently a bonus buy.  I'm excited that we'll have both kinds of runs to play with!


Thursday, September 19, 2013

Light Table Letters

I am SO excited to have a light table for Xander!  I definitely want to make sure I make the most of it, so right away I went searching for letter tiles for it.  I learned that they are a little difficult to find and kind of expensive when you do.  Therefore, I decided to make my own.

I picked up some alphabet stickers at Michaels (buy one get one free!!).  The ones I got have a little bit of a metallic border and then a thinner middle.  I choose red and blue so I can match the vowel and consonant colors to his magnetic letter set.
 I stuck the stickers to the laminating sleeves, ran it through, and cut them out!
 I left a little bit of a border around each letter, so it is more like a tile, but you could cut close around each if you preferred.

There you go, now we can make lots of fun words on the light table!

Sunday, September 8, 2013

DIY Foam Letter Tiles

You may have noticed in last week's school post that I had some new letter tiles for Xander.  I wanted some letter tiles for the Beginner Spelling Cards, but was too impatient to wait for them to come in the mail.  Instead, I cut some leftover foam into 1 inch squares.  Took about half an hour to get a bunch of tiles.

To correspond with our magnetic alphabet box, I put all of the consonants on blue and vowels on red.

Thursday, September 5, 2013

DIY Light Table Shapes

Wal-Mart recently had these translucent plastic pencil pouches clearanced to 25 cents each.  I snagged one in each color, knowing I would find a way to turn them into light table toys!
 It didn't take me long to decide on making shapes!  I grabbed Xander's wooden shape puzzle (similar to this one) and "traced" each shape with an Xacto Knife.  Then I cut along the markings.
 Ta-dah!  A bunch of inexpensive shapes that can be used for sorting by shape or color.


Thursday, August 29, 2013

Writing Practice Sand Box

This school year we are focusing on how letters are formed.  As a fun way to practice, I made Xander this sand box.

It was super simple.  I just started with a photobox and some colored sand.
To get about the height I wanted, I put the lid on and placed a ruler just under.  Then I traced under the ruler.
I got to try out my sklls with a utility knife, but was able to get the box down to size without incident.
I put a white paper in the bottom for contrast, and poured in some sand.  However, I quickly realized I had WAY too much sand.  I slowly removed it until I had an amount the would cover the bottom, but still show up when I wrote in it with my finger.
Tadah!  There's my sand box.  A rubber band holds the lid securely, but it will still live on a high shelf!

Tuesday, August 20, 2013

Paint Bag Pre-Writing Fun

One of of my main focuses this year is practicing pre-writing skills.  Therefore, I have been on the hunt for fun activities to develop these skills.  One super simple way to practice is with a paint bag!

I first gave Xander a paint bag when he was four months old (in this post)

The bag is made by cutting two pieces of Glad Press n Seal to about the same size.  Then squirt a good amount of paint into the middle of one piece (I used maybe 1/4-1/3 of a cup of Crayola washable finger paint).  Put the other piece of Press n Seal on top (sticky sides in), seal around the edges and trim the extras.  Then tape around the edges to hold it all together.  I used orange duct tape, just because I had it and thought it would be more fun than regular masking tape.

It is a lot of fun to squish the paint around, but I am hoping to practice writing letters and making intentional lines with it!
Xander had a good time shaking up the paint for me!


Thursday, August 23, 2012

Bottle Cap Letters

As I was collecting materials for Xander's alphabet themes, I considered buying the generic plastic letter tiles.  While there is absolutely nothing wrong with them, I decided I wanted something a little bit more fun.  I also saw some neat wooden alphabet disks at The Princess and the Tot.  While I did end up making some similar to hers, I wanted to be able to make multiples of each letter for letter matching sheets.  The wooden discs are nice, but add up when you start buying a lot of them.  Instead, I ended up with the bottle cap letters pictured below.  I bought 100 of these bottle caps, but I have also seen them at craft stores.  With a regular Sharpie I was able to create multiples of each letter within minutes!  I started out with two capital and two lowercase of each letter, but have some left over bottle caps to add letters as I need.  I already created pages to go with these and I am really excited to use them!  The only thing I would change is possibly writing the lowercase letters with a blue Sharpie for some distinction between the cases.


Xander loves to dig through the box of letters!  I found him throwing them at the wall the other day...

Be sure to watch for the bottle cap matching cards in my Mommy & Me ABC printables!
Related Posts Plugin for WordPress, Blogger...